@ninja_zx11 wrote:
HI all,
Can we get synthetic airspeed on the OSD without using pitot tube on a Heli same like we have on a arduplane?Thanks.
Posts: 1
Participants: 1
@ninja_zx11 wrote:
HI all,
Can we get synthetic airspeed on the OSD without using pitot tube on a Heli same like we have on a arduplane?Thanks.
Posts: 1
Participants: 1
@craigy72 wrote:
Hello All,
I’m having trouble connecting BL Helo_32 Suite to my ESC via Ardupilot (4.0.5) pass through. Below are my settings in Ardu.
I’m using the latest version of BL Heli 32 Suite (BLHeliSuite32_32714). The program just seems to crash, goes to ‘not responding’ and I have to close down the application via task manager. I’m using the Betaflight interface.
I have tried another version of BL Heli 32 Suite 32.6.1.0 and I seem to get better results but it still errors. It seems to goes into a continuous loop if I look in the logs. Please see below
Any help would be much appreciated.
Posts: 2
Participants: 2
@jbdrones wrote:
Hi Everyone,
First off, I just want to say that I appreciate any help in advance because I am driving myself crazy trying to figure this out.
Basically, I am trying to setup a simple fixed wing plane using arduplane, pixhawk 2.4.8, and mission planner. I followed all the steps online and watched videos (Painless360) helping to set it up. Everything works perfectly except the motor won’t start and I can’t throttle it. On the servo configuration page, the throttle bar correctly follows the inputs from the transmitter. For reference I am using the Taranis Q7X7 and X8R. I am using a simonk esc and a multistar motor. I have used all these exact components for quads before and it works great (I went back and made another quad today with the same equipment to make sure it all still works and it does). I am also running the latest version of arduplane (I believe 4.0.5).
Thus far I have tried using older firmwares, different esc/motor combinations, and Qgroundcontrol. I have tried the method of manually calibrating the ESC by powering it separately with the RC throttle all the way up and then powering it down (this did not work). I know all my hardware works and I can tell that the receiver is getting the throttle inputs because they show up on both the radio calibration and servo page. I am using the standard method of throttle on channel 3. Like I said the servos all work and move to stabilize the plane when I move the pixhawk around.
It seems like the issue is somewhere between the pixhawk communicating with the esc. Like I said earlier, it’s weird though because the same rails on the pixhawk work with the same ESC/motor when in arducopter.
If anyone has any ideas or needs more information to help, please let me know!
Thanks
Posts: 1
Participants: 1
@carl wrote:
Hello. I have been following the guide here on setting up Arduplane on an Omnibus F4 V3 Pro:
https://ardupilot.org/copter/docs/common-omnibusf4pro.html
In particular removing the diode so that I can isolate the servo power rail and power servos from the BEC on my ESC. However I am not sure it is working as expected. If I simply plug the battery in the servos spark into life and I can control them even tho the diode is not there and no external bec on the servo rail. Also plugging the powered bec into pwm1 powers the board. Surely if I have isolated by removing the diode this should not happen?
Video here: https://youtu.be/RdaOwGIE-O4
If I have the this wrong then what diode have I removed?!
Thanks
Posts: 1
Participants: 1
@ekrell1 wrote:
Hello everyone,
I am currently working on converting a commercial RC boat to autonomous using ArduRover (boat) on a Pixhawk Mini. Here is the vehicle: https://www.emilyrobot.com.au/. Also, I did not actually integrate the Pixhawk with the hardware. This was done by others, but I am setting up the firmware and doing the testing. Its not my boat, so I can’t cut into the hull. The Pixhawk, GPS, RC receiver, and Sik radios are all in a pelican case together. I think it is not ideal to have the GPS in the case down inside the boat’s interior.
In the lab, the only issue is that the compass calibration is reported as medium. Displayed right in the middle of the yellow bar within QGroundControl. I tried multiple times to calibrate, but the boat is a bit unwieldy to turn on all those axes smoothly.
I have conducted three short field trials. Note that I am operating in the Laguna Madre in the very windy Corpus Christi, Texas. There is substantial current and wind acting on the vessel. In the first test, I only tested manual control. It worked, but with two issues. One, the range was limited to ~280 feet. I even put the GCS Sik dongle on a tripod. More critically, it was very often going into hold mode due to “high EKF variance”. Then it would be “initializing” for ~30 seconds before I could regain control for a little while.
In the second test, I tried waypoint following and RTL. Both worked, but with substantial weaving. I am not worried about this since I know I need to tune it. It takes a lot of thrust to make a sharp turn. However, I was still experiencing the “high EKF” and initializing when using Manual control.
Today was the worst test of all. I went out with the intention of tuning the control, but was unable to maintain any modes for more than a second. As soon as I applied any throttle in manual mode, high EKF variance and initializing occurred. Whenever I tried auto, guided, or RTL… same thing. It was windy all three trials, but today was by far the windiest. The vessel pitches and rolls considerably. Perhaps this confuses the EKF, but at the same time I expect people have been using ArduBoat in rougher conditions.
So, basically, does anyone have any insights regarding this high EKF variance issue? I have seen several builds where the Pixhawk and GPS are down in a Pelican case, so I think it should be usable even if its not perfect. Basically, I am not sure if I should focus on better placement of the components or if I am missing something obvious that I need to address. I can worry about radio range and tuning later, but I can’t do much of anything if I can’t maintain control. Let me know what additional information I need to provide.
Once I have this boat working smoothly, I will integrate my sensors and autonomous mission planning software. I have code for onboard seagrass classification, water-currents aware path planning, mono-vision collision avoidance, etc. I’ll be happy to share my progress.
Thanks in advance!
Posts: 2
Participants: 2
@LuckyBird wrote:
1. Introduction
In this blog post, we will attempt to extend ArduPilot’s obstacle avoidance ability with the Intel Realsense depth camera.
2. Prerequisite
Harware
- Onboard computer with at least one USB 3.0 port.
- x86-based CPU is recommended for compatibility with Intel’s libraries and hardware. I am using the Up Squared SoC board. For other boards of other architecture (RPi, Jetson etc.), you might encounter troubles with installation the packages below.
- Since we are processing depth images to some degree, it might be the case the processing speed will vary greatly between the RPi4, Up2, Jetson Nano/TX/Xavier etc. So keep that in mind to tune the system if the performance is not satisfactory to you.
- Sensor: we are using the Realsense D435 depth camera, but presumably you can also use the program with the D415 or D435i without any modifications (except for general settings).
- The camera is assumed to be facing forward. For other orientations, you need to change the code, but the process is straightforward, as will be explain in the discussion section.
- Vehicle:
- Any DIY copter of your choosing. The content of this post has been tested with copter. For rover, the AP’s parameters should be changed following the corresponding wikis.
- Configuration: rangefinder and optical flow sensors would be necessary for stable flight. I am using the TeraRanger One and PX4Flow.
Software
- OS: Ubuntu 18.04. Highly recommended as this release is the most up-to-date with the required libraries.
- Please note that we will provide support exclusively on this version. For earlier version of Ubuntu, you need to modify each installation step to work for your case (in case of too many conflicting installations, you may find Anaconda to be helpful).
- Python 3.6 and above, which is also the standard for Ubuntu 18.04. Check with
$ python3 -V, you should see the version, something likePython 3.6.9.librealsense: download or install from source.3. Installation
- Installation of supporting packages:
pip3 install pyrealsense2
pip3 install transformations
pip3 install dronekit
pip3 install apscheduler
pip3 install pyserial # For serial connection
pip3 install numba
pip3 install opencv-python

# Only necessary if you installed the minimal version of Ubuntu
sudo apt install python3-opencv
- Download the script, or clone the ROS node if you are using ROS (although we won’t cover ROS in this blog post):
# Clone the package in the ROS workspace or any location if you don't use ROS
cd ~/catkin_ws/src
git clone https://github.com/hoangthien94/vision_to_mavros.git
cd vision_to_mavros/script
chmod +x d4xx_to_mavlink.py
chmod +x opencv_depth_filtering.py
- The main script to be used with AP is
d4xx_to_mavlink.py. The second script,opencv_depth_filtering.pyis used to test out different filtering options, which is explained in more details in the final discussion section.4. Parameters modification
4.1 Companion computer side
Within the script
d4xx_to_mavlink.py, find the following parameters and reconfigure them if need to:
- Connection to the flight controller:
# Default configurations for connection to the FCU
connection_string_default = '/dev/ttyUSB0'
connection_baudrate_default = 921600
- General settings for the depth camera, check the datasheet to make sure your combination of w x h x fps is supported:
WIDTH  = 640              # Defines the number of columns for each frame or zero for auto resolve
HEIGHT = 480              # Defines the number of lines for each frame or zero for auto resolve
FPS    = 30               # Defines the rate of frames per second
- Make sure the
OBSTACLE_DISTANCEmessage is enabled and change the default data frequency if need to:enable_msg_obstacle_distance = True obstacle_distance_msg_hz_default = 15
- For debugging purpose with a monitor, enable the debug option:
debug_enable_default = True
- Additionally, there are more elaborate configurations that I recommend to test them out after you get the system to run at least once:
- Visual preset to improve the depth data provided by the camera,
USE_PRESET_FILE = True
PRESET_FILE  = "../cfg/d4xx-default.json"
- Post-processing filters to enhance the quality of depth data and reduce noise levels.
#List of filters to be applied, in this order.
#https://github.com/IntelRealSense/librealsense/blob/master/doc/post-processing-filters.md
filters = [
  [True, "Decimation Filter",     rs.decimation_filter()],
  [True, "Threshold Filter",      rs.threshold_filter()],
  [True, "Depth to Disparity",    rs.disparity_transform(True)],
  [True, "Spatial Filter",        rs.spatial_filter()],
  [True, "Temporal Filter",       rs.temporal_filter()],
  [True, "Hole Filling Filter",   rs.hole_filling_filter()],
  [True, "Disparity to Depth",    rs.disparity_transform(False)]
]
4.2 ArduPilot side
- The serial port & baudrate should be modified according to your setup:
SERIAL5_BAUD = 921 # the serial port used for connection
SERIAL5_PROTOCOL = 1
- Enable simple avoidance behavior, also descibed in this wiki. Note that if
PRX_TYPEis not set, the Proximity view in the following section will not show anything:PRX_TYPE = 2 # MAVLink
- Configure avoidance behavior. AP supports different strategies to avoid the obstacle. In this blog post, we will focus on the simple “stop” behaviour as our baseline. Change the following parameters to fit better to your environment and vehicle’s size:
AVOID_ENABLE = 7     # (“All”) to use all sources of barrier information including “Proximity” sensors

# For Loiter mode:
AVOID_MARGIN = 1.5   # How many meters from the barrier the vehicle will attempt to stop or try to slide along it
AVOID_BEHAVE = 1     # Whether the vehicle should simply Stop (1) in front of the barrier or Slide (0) around it

# For AltHold mode:
AVOID_DIST_MAX = 1.5 # How far from a barrier the vehicle starts leaning away from the barrier in AltHold
AVOID_ANGLE_MAX = 3000 # How far the vehicle will try to lean away from the barrier
5. Ground test
If you don’t have a monitor plugged in, disable the debug option in the script by setting
debug_enable_default = Falseor add the argument--debug_enable 0when running the script.Run the script with:
cd /path/to/script
python3 d4xx_to_mavlink.py
- If the debugging option is enabled, wait until the input and processed depth images are shown. The processing speed (fps) can be seen in the top right corner:
![]()
Check that the
OBSTACLE_DISTANCEMAVLink message is being received (Ctrl-F -> MAVLink Inspector):
If you have a stable telemetry connection, the data frequency for
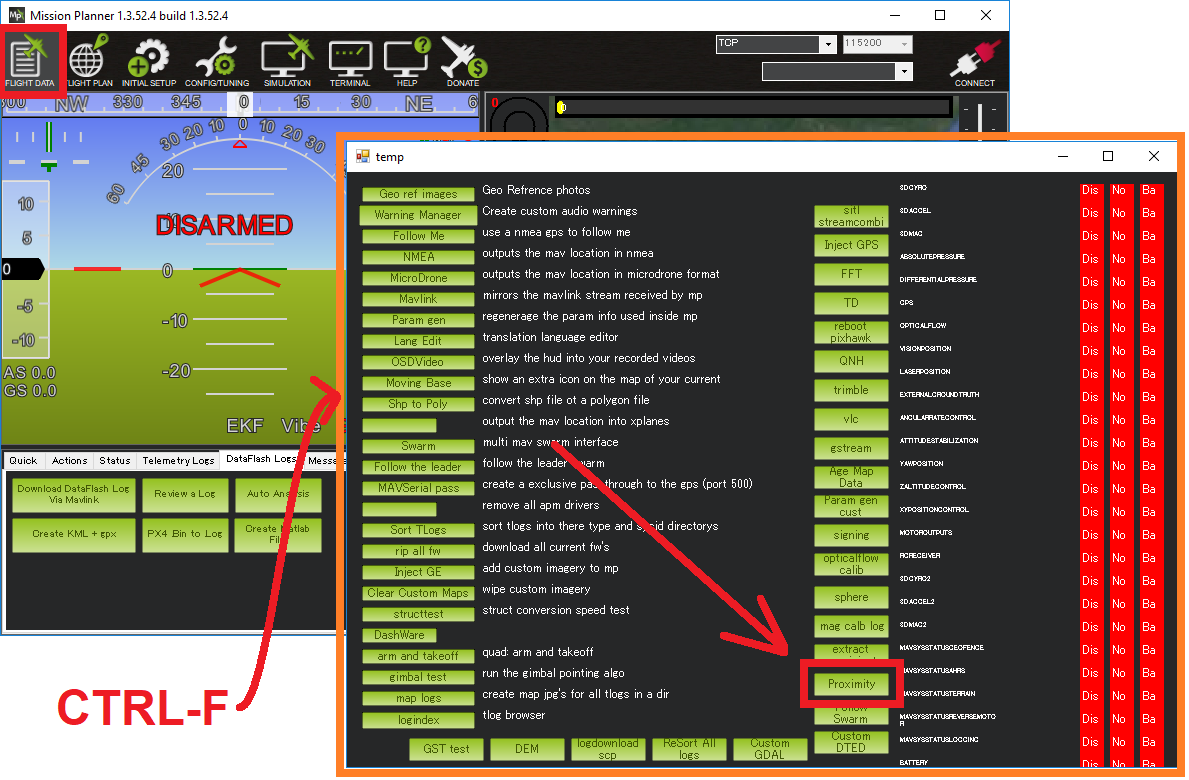
OBSTACLE_DISTANCEmessage should be close toobstacle_distance_msg_hz_default. If not, use a USB cable to connect AP and GCS to verify whether the obstacle avoidance data is being received as intended by the FCU at least.Within Mission Planner, open the Proximity view (Ctrl-F -> Proximity):
Put the vehicle/depth camera in front of some obstacles, check that the distance to the nearest obstacle is accurate is shown in the Proximity view:
Note: as of this writing the proximity view of Mission Planner for
OBSTACLE_DISTANCEmessage will group every distances within 45-degrees arc together (in total 8 quadrants around the vehicle), so at most only 2 distances will be shown at any one time on the Proximity window (since the camera’s FOV is less then 90 degrees).6. Flight test
Make sure the debug option is disable:
debug_enable_default = TrueFlight test:
- Procedure: Take-off -> AltHold / Loiter -> Move toward the obstacle.
- Expected behavior: The vehicle should stop/slide (set by
AVOID_BEHAVE) at a certain distance away the obstacle (set byAVOID_MARGIN/AVOID_DIST_MAXdepending on the flight mode).- For the first few tests, only push the vehicle gently and observe the reactions. Then you can speed up and fly more aggressive to test the limits.
Since the camera has limited FOV and min/max depth range, it is important to test the limits to ensure safety for your vehicle. Make sure you have a rough estimate of these margins and put some overheads into the parameters.
Demo video testing the behavior as well as the FOV and minimum safety margin that works for my vehicle. The flights were conducted in Loiter:
7. How does it work?
In a nutshell, we need to find a way to convert the depth image provided by the Realsense camera into distances to obstacles. AP supports
DISTANCE_SENSORandOBSTACLE_DISTANCEMAVLink message, with the former carries a single distance and the latter carries an array of distances.OBSTACLE_DISTANCEallows us to send up to 72 distances at once, so it will be used.It is important to apply some form of filters on the raw depth image to avoid black holes, noises and generally improve the data to obtain more stable results. Here is full list of filters that are incorporated in our code, which you can enable individually. To test the settings for different filters, you can use the
rs-depth-qualityexample provided bylibrealsenseor run theopencv_depth_filtering.pyscript.# Run the script. You can enable/disable each filter and modify the settings in the pop-up window. python3 opencv_depth_filtering.pyOur input data is this processed depth image, and what we want is an array of distances. The distances need to be on the same horizontal line since the message contains no field to distinguish different pitch angle. We devide the horizontal field of view of the camera into 72 evenly spaced rays. Along each ray, we select the pixel corresponding to the end of the ray and pick out the depth value.
The next question is how to actually populate the message. The main key takeaways are:
- Choose the direction with which to fill out the array (clockwise or counter-clockwise).
- Calculate the
angle_offsetandincrement_fso that the 72 distances cover the whole FOV (field-of-view) of the sensor.- Example, for clockwise direction
angle_offset = camera_facing_angle - FOV/2andincrement_f = FOV / 72. For forward facing camera,camera_facing_angleis simply0. For other orientation, change this parameter accordingly.- If you reconfigure the array so that the array cover a larger area than the actual FOV, put
UINT16_MAXto any unknown elements.The message should be sent at 10Hz or higher, depends on how fast the vehicle is moving.
8. Conclusion and next steps
The RealSense T265 tracking camera is already supported by ArduPilot to obtain accurate GPS-denied navigation, while the D435 enables obstacle avoidance. Together, the cameras enable a robot to create a map of its environment and navigate autonomously within the map. Combining the power of the two is our next target in this GSoC 2020 project. Stay tuned!
Useful resources
- Recommendation to improve D4xx depth data for drone: web article, paper, github.
- List of post processing filters: link.
Posts: 1
Participants: 1
@bpoxman wrote:
Hello . After upgrade of my arducopter from 4.0.1 to the last 4.0.3 , I receive the error message "Prearm: logging failed . Moreover , trying to access the logs with the button “Download Dataflash logs …” , the system tells me there are anything on the SD card, when in fact it contains old recorded logs.
I got around the problem by removing the option “Logging available” in the ARMING_CHECK to make a flight , but no logs has been recorded.Returning to the 4.0.1 is okay , the message is gone and I can see my old logs.
I specify that I use a pixhawk 2.4.8.
But the problem is that without correcting this error of this new version, it’s not recommended to upgrade and fly safe without being able to analyze the incidents.
Thanks !!
Posts: 1
Participants: 1
@petru6kin wrote:
I write through a translator
tell me which flight controller to use for a large drone 1400 mm.
to avoid vibration problems and simplify setup. the frame will be aluminum; it transmits vibration from the propellers well.
Posts: 2
Participants: 2
@Vincenzo_Ruotolo wrote:
Hi,
I’m new here and I hepe to do things correctly. I’m trying to run a SITL in guided mode in GPS denied conditions of a copter, but at the end of all i always notice the errorFCU: PreArm: Need 3D Fixand it doesn’t allow me to arm motors.
Just one consideration: I know that is unsafety relying only on IMU to get the state of a drone, but this reards only the simulation contest and later there will be the integration of sensors to get robustness.I’ve set the parameters in order to disable also the GPS and pre-arm checks:
## FRAME
FRAME_CLASS	1
FRAME_TYPE	1
## EKF
AHRS_EKF_TYPE	2
EK2_ENABLE	1
EK3_ENABLE	0
## GPS
GPS_TYPE	0
EK2_GPS_TYPE	3
VISO_TYPE	0
COMPASS_USE	1
AHRS_GPS_USE	0
## Arming
ARMING_CHECK 	0
ARMING_REQUIRE 	0
## SIM
SIM_GPS_DISABLE 1
SIM_GPS_TYPE 	0
About these parameters I have 2 doubts. The first is that
ARMING_REQUIREdoes not exist (even if it is present in the full parameter list). The second is that it’s not clear the difference beetween SIM_GPS_DISABLE and GPS_TYPE.Anyway after making sitl starting (
sim_vehicle.py -v ArduCopter --console --map) and also mavros, I changed in guided mode and finally set Home (with height) and Origin (with height) on MAVProxy map.
I post here the log of mavros on terminal: mavros_log.txt (14.6 KB)I guess I’m missing something foundamental but i’m not sure what.
Posts: 1
Participants: 1
@Nautics wrote:
Good Evening,
In a fairly new hexacopter build (it has 4 flights mostly in Stabilize and Loiter) running Arducopter 4.0.3, i tried today for first time RTL and AUTO.
(not my first build, not my first time using AUto and Rtl but first time with this craft
and arducopter 4.0.3)While in complete flight having more that 12sat and always 3dfix i came across two problems
Switching to RTL simply stops the copter in place, hovering, in a stable altitude
and never returns to Land. ( parameters are set up for landing). On this flight tried two times. In the previous flight tried with smart-rtl same response.Switching to Auto during Loiter flight completes only the first waypoint.
In this specific log it had reach wp1,then stops and loiter indefinitely above wp1.( until i changed to Loiter mode)
I had waypoint radius 1m and i also tried Delay time 1 sec and 0 sec (didn’t changed anything). In previous flight i setted up take off command first and then the same 4 wps. It again executed only the take off command that time.At the following link(we transfer) is the log .bin from the flight
Please any suggestions are welcomed,
Thank you in advance.
Posts: 1
Participants: 1
@truxcode-fly wrote:
Hello,
I’m flying a quad with an embaded jetson and a herelink. The jetson has a camera which is filming the floor and an openCV detecting someone moving. I would like to do a “Follow” with the drone so i had the idea to use the same code as IRlock. First i would like to know if this is relevant. Then i was thinking about the MAVlink orders priority, what would happen if i take the control with the herelink in GUIDED mode and the jetson keep sending orders ?
Posts: 1
Participants: 1
@ajaykarthikr wrote:
Hi all! I’ve been trying to listen to mavlink messages sent by GCS(QGroundControl) to Ardupilot(SITL) using a companion computer runninig a ROS node. I am unable to see any messages in
rostopic echo /mavlink/to. But I am able to see messages sent from Ardupilot(SITL) usingrostopic echo /mavlink/from.
This is the command I used to launch mavrosroslaunch mavros apm.launch fcu_url:=udp://127.0.0.1:14551@14555 gcs_url:=udp://@I suspect I am doing something wrong in this. Or is it even possible to read and send mavlink messages from a companion computer.
Thank you.
Posts: 1
Participants: 1
@MCITYFC wrote:
Hi guys
I’m using RFD900 for telemetry. I don’t know why but they keep deteriorating after a few months of use. My GCS RFD uses both antennas. The rover module uses 1 antenna, and I use the RFD tool to configure the rover setting to only one antenna port. I’m NOT on the default netID channel of 25, and I’m certain no one around me is using a 900mhz radio.The problem I’m observing is that the radios would connect as normal, but the sig strength on the top right of the HUD hovers around 50-70% while I’m standing next to the aircraft.
Does anyone else have experience with this problem?
Posts: 2
Participants: 2
@MCITYFC wrote:
Hi guys
I tried using using the BATT_WATT_MAX parameter to limit the power output of my plane, especially when it’s initially on a full battery and performing a climb. The Motor is limited to 400W power due to packaging, while at high voltage at ESC’s rated current, the motor will blow.
So I ran a quick ground test where I set the BATT_WATT_MAX to something very low, 200W, tricked the airplane into flying in auto, and I would see the throttle reset to 1300PWM as soon as the power threshold is triggered. It will slowly creep up to the threshold again, before dropping to 1300PWM and repeating the creep back up. I looked into the code and it seems to be working the way it’s designed to.
My question is, why was it designed this way? why can’t we have the throttle bounce off the power limit or sustain the power limit? why is it designed to significantly drop the throttle and ramp back up slowly?
PS. if you fly the plane in manual, it will throttle back to 1300 and stay there, making it very difficult to fly.
Posts: 3
Participants: 2
@Moksh wrote:
Hello everyone , i hope all are good
Yeah I’m little outside of this month but still love this community.
My question is can we make qground control as a online job like a no need telemetry just turn on internet and same thing as on with telemetry.
Thank you
Posts: 1
Participants: 1
@Cutacopter wrote:
I’m looking for opinions on the Holybro pixhawk4 mini.
We are thinking of using this FC in our consumer fishing drone.
Is it reliable?
What are the flyaway tendencies like?
Thx.
Gary
Posts: 1
Participants: 1
@elgarbe wrote:
Hi, currently I’m using AP connected to a raspberry pi 3 and a raspicam (8 MPx model). I write a python script to take pictures and grab exif data from mavros.
But I would like to test another option and it’s mapping using survey flight plan. In order to do that I will need to shoot raspicam with pixhawk command. can someone point me out on how to achieve that? Is AP changing some pixhawk output on every shoot?Thank!
Posts: 1
Participants: 1
@N_J_P wrote:
Hello everyone, I’m new at this and just finished building 450mm Pi/Navio2 UAV. I have been unable to launch it successfully, as it tips to its forward starboard corner and flips. This is in the stabilize mode. I have upgraded to ARDUCOPTER 4.0.3. Power train: 3S 3000 mAh battery, emax 2213 935kV motors with 1045 props, and Hobbypower 30A ESCs. Things I have checked during the troubleshooting:
- ESC control wiring / NAVIO2 connections - #1 Fwd Stbd, #2 Aft Port, #3 Fwd Port, #4 Aft Stbd
- Motor rotation direction and prop orientation. #1 and #2 are CCW, #3 and #4 are CW, and pitched in the correct direction
- I have changed the micro usb card to a 32 GB U3 SanDisk. (with a fresh image)
- I have recalibrated the ESCs by plugging them into #3 on the Rx powering up with full throttle…etc.
- I’ve been through the setup several times and have also reloaded default parameters.
Any help or advice would be greatly appreciated.
Cheers,
Barry
Posts: 7
Participants: 2